Falling into Place
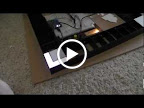
After spending far too long trying to fine-tune the diffuser pieces using sandpaper and files, I finally listened to the reason of posters online and set my routing table up. Using a flush-cutting bit with a bearing, I ended up taping the pieces to a small board, letting just about how much I wanted to remove overlap the edge. Amazing how much easier using the right tools makes a task. After spending a few hours between the board and the router table, I finally have pieces that fit all the spaces reasonably well. I’m sure as I start working with the graphics, I’ll probably find bits that aren’t quite right, and decide to retune some of them, but for now I’m reasonably happy. The board is actually starting to look a little bit like an actual board now, although none of the pretty graphics are in place yet; in fact, most of the protective cover is still there, so it looks a little more ragged than it really is.
Speaking of the graphics, I learned about a new technique and ordered some equipment to try. Waterslide decals. Basically, it’s a soluble paper base with a shiny (maybe adhesive) layer to print on. You then spray a few coats of clear gloss acrylic after printing, cut it to size, soak in water, then place the decal where you want it and slide the paper backing away. Looks promising, and a test run taught me a couple of things about it. Will try again soon, and if all goes as I hope, I’ll have a good looking solution to the graphics task. In the meantime, enjoy this board that’s starting to look like a board.


Time for Reflection
It’s taken several evenings of work, but finally got all the white diffuser/reflector pieces in place. The really nice thing about that is it adds some not insignificant structural support to the piece. Carrying it around doesn’t feel nearly as fragile as before. Not a whole lot else to report, so have a couple of shots with all the reflection in place.


The L-Word. I Mean Space. The L-Space
It’s finally time to start actually putting the spaces together and making things fit. Decided to start with the corners because they’re both the easiest and hardest spaces to do. Easiest because they’re the deepest ones I’ve designed. Hardest because of this:
 Silly me, wanting to be all perfectionist, decided that Jail and Just Visiting are truly two independent spaces, which means they have to light up separately. Since the jail is permanently orange, it’ll get a simple white LED with appropriate color graphics, but I still wanted the Just Visiting side to get a full RGB treatment. Not because you can buy the property, but because it looks that much cooler if I can do color chase patterns around the board. Anyway, this meant I had to figure out how to position that single LED so it could light up the full L shape without bleeding over into the In Jail square.
The result was a 45 degree angle piece that runs just along the JAIL text, below the floor of the Jail space itself. A bit of electrical tape helped ensure that no excess light from the LED mounted there would sneak up into the other space. After using quite a lot of plastic cement, things were finally ready for a test. Again I have a video, and again it shows up much hotter and whiter in the video than it does in real life, but I think you can at least see that full space is getting lit, and Jail is staying nice and dark.
Flame Off!, or, Like Sands Through the Hourglass
I’ve been pretty anxious to start putting together the surface supports for the board, but managed to convince myself to hold off until I figured out how I could clean up the exposed surfaces of the black acrylic. What I’ve always read is that the single best way to finish acrylic edges is by using flame polishing. Basically, move a torch quickly along the edge so the acrylic very briefly melts, then reforms a glossy, polished edge.
Great theory.
I went out to get a torch, which may be useful for other things later, and tested it out. Sure enough, it can melt the plastic, but there was one tiny problem. The acrylic I have is so thin the process caused warping. After reading up a bit more, someone mentioned that it wasn’t worth even trying on 4mm acrylic, and it turns out this stuff is closer to 1mm. So, back to the drawing board. Time to sand.
(As a side note, I really would have needed to do the sanding anyway; the flame polishing won’t fix problems like saw marks, which I had quite a lot of.)
After spending a while using various sand papers, sanding sponges, and files, dear wifey was about ready to climb the walls from the horrid screeching noise. This, combined with the fact that it was an awfully tedious, unproductive process, drove me to look for an alternate solution. The answer finally came in a series of posts discussing doing detail sanding work on wood carving, and mention was made of various rotary tool sanding options.
Off to the hardware store this morning, to return with a new Dremel sanding kit. Had several different types of sanding, buffing, and polishing wheels. Unfortunately, they weren’t individually marked, so I had to make some guesses about which ones were which grits, but eventually I figured out a good order, and managed to get a pretty smooth finish on all the exposed edges. Unfortunately, my not-steadiest hand meant that in several places the wheels bit into the material too much, and left some parts rather more sanded down than intended, but it should be good enough. After all, the point of this is the nice lighted panels, not the black dividers between them.
But I want those dividers to look nice enough to not draw attention, at least.
Once More, With Feeling
Noticed as I was looking at the photos of the framework that at least a couple of the color bar dividers were crooked. Boo hoo. Tried to tweak them a little and found I could safely remove the pieces to try to reglue them. I decided to take the opportunity to try to even out the spacing of the spaces a little as well. Several hours of work later and I think things are a little bit better spaced, a bit less crooked, and a bit flatter. I hate spending the time doing rework, but I also want to do this right, so I guess I should be glad to spend the time fixing mistakes now rather than looking at it after I’m done and thinking “Gee, I wish this was a little better…”
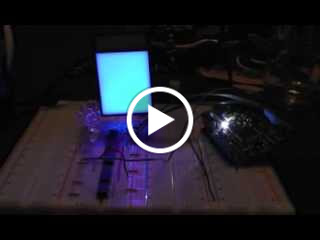
Taste the Rainbow
Got the new breadboard in as a birthday present (thanks Dee!) and finally got the circuit transferred over. It immediately appeared to be better, as the behavior was more consistent, even if not exactly what I wanted. Initially, I could tell during the pulse cycle exactly when the LEDs were at full intensity, and exactly when they were off. The times in between, however, were all identical. After looking over schematics and pinouts, though, I discovered a couple of swapped connections. Amazing how not hooking things up in the right order can make it not work.
After fixing the incorrect wiring, the circuit began acting as expected, although at some intensities the LEDs had a very annoying flicker. Regardless, I carried on, but the flicker continued to annoy. I eventually figured I should swap out my oscillator chip for a faster one, but realized I had the fastest one I ordered already in, at 3.0 MHz. So, figuring I had nothing to lose, I swapped in the slower 1.5 MHz chip, and suddenly the flicker was completely gone! Guess the higher frequency was just a little too much for the LED driver running at 5V off the Netduino.
With the flicker gone, I finally started to play with some actual color values, and set my prototype space back on the RGB LED. As I’m typing this, I’m watching it cycle as follows: Off, white, red, green, blue, yellow, magenta, teal, and a repeat of the colors in a much darker, muted version. I’m hoping to allow the colors to be customized while playing, but for now this is a really great milestone, as it’s showing a wide range of colors using the type of materials I’m building with, and the blending on the actual surface of the space is really quite pleasant. This gives me the highest of hopes for the results of the full build.
(Click for video if you’re interested)
A Framework Black
 The last several days have been spent working on the main frame of the board. It’s been a lot of work, but I think the results are pretty good. Lots of holes drilled for the various LEDs, and nothing has shattered. (Yet.)
The framework is built out of 1/16 inch solid black acrylic. This is fortunately the same thickness as the lines on the board, so these will show between the lighted panels to provide the appropriate markings, while also keeping light from bleeding between the different spaces. Didn’t get the measurements exactly right everywhere, so a couple of the spaces aren’t quite right, but if you can’t tell which ones they are, I’m not going to tell!
Unfortunately, I think I’m going to have to redo the panels themselves. After looking them over, the cuts weren’t very clean, and some of the pieces aren’t quite the right sizes, so after confirming this with the framework, I’ll probably be back to the table saw to work up a new batch. Oh well.


-
Archives
- November 2012 (2)
- October 2012 (1)
- September 2012 (4)
- July 2012 (2)
- June 2012 (7)
- May 2012 (6)
- April 2012 (5)
-
Categories
-
RSS
Entries RSS
Comments RSS